istio 설치
istio command cli 다운로드
Istio 릴리스 페이지로 이동하여 사용 중인 OS용 설치 파일을 다운로드하거나 최신 릴리스를 자동으로 다운로드하여 압축을 풀어줍니다.(Linux 또는 macOS):
위의 명령은 Istio의 최신 릴리스(숫자)를 다운로드합니다. 명령줄에 변수를 전달하여 특정 버전을 다운로드하거나 프로세서 아키텍처를 재정의할 수 있습니다. 예를 들어 x86_64 아키텍처용 Istio 1.23.2를 다운로드하려면 다음과 같이 실행합니다:
curl -L https://istio.io/downloadIstio | sh -
-
Istio 패키지 디렉토리로 이동합니다. 예를 들어 패키지가 istio-1.23.2인 경우
- 설치 디렉터리에는 다음이 포함됩니다:
- samples/ 디렉터리의 샘플 애플리케이션
- bin/ 디렉터리의 istioctl 클라이언트 바이너리.
- 경로(path)에 istioctl 클라이언트를 추가합니다(Linux 또는 macOS):
curl -L https://istio.io/downloadIstio | sh -
# or
curl -L https://istio.io/downloadIstio | ISTIO_VERSION=1.23.2 TARGET_ARCH=x86_64 sh -
cd istio-1.23.2
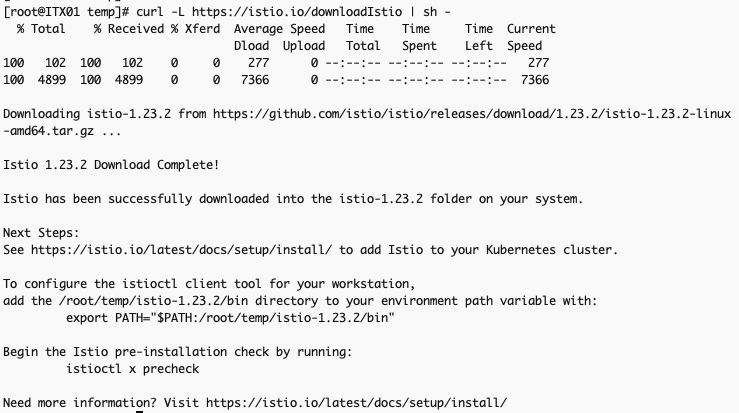
vi ~/.bash_profile 에 istio-1.23.2/bin을 path에 추가합니다.
export ISTIO_HOME=$HOME/istio-1.23.2
export PATH=$PATH:$ISTIO_HOME/bin
.bash_profile 을 다시 적용합니다.
source ~/.bash_profile
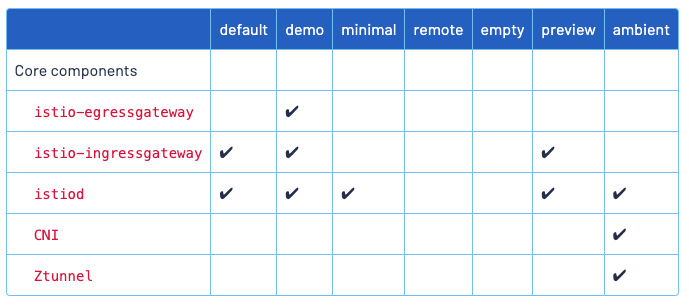
istio 설치
istioctl install
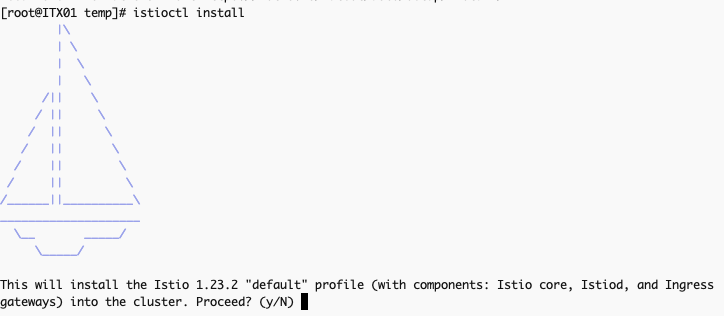

- istio 설치 확인
다음의 명령어로 istio 설치를 확인합니다.
kubectl get po -n istio-system
# unlabeld
kubectl label namespace default istio-injection-

# labeled
kubectl label namespace default istio-injection=enabled
enable ingress
ingress를 enable 합니다.
minikube addons enable ingress
ingress-bookinfo.yaml 파일을 작성합니다.
apiVersion: networking.k8s.io/v1
kind: Ingress
metadata:
  name: ingress-bookinfo
spec:
  rules:
  - host: example-demo.com
    http:
      paths:
      - path: /productpage
        pathType: Prefix
        backend:
          service:
            name: productpage
            port:
              number: 9080
kubectl apply -f ingress-bookinfo.yaml
/etc/hosts에 minikube ip 등록
GATEWAY_URL=$(minikube ip)
echo $GATEWAY_URL

# /etc/hosts
192.168.49.2   example-demo.com
Deploy the sample application
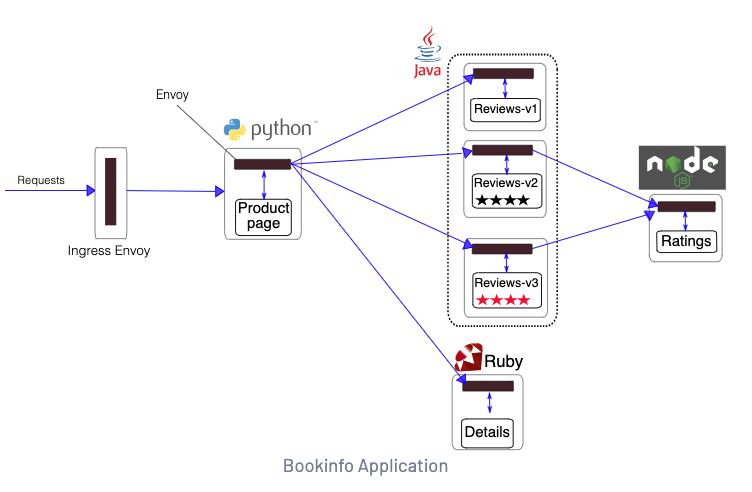
Istio로 대표적인 샘플 bookinfo 애플리케이션의 전체 구성은 다음과 같습니다.
kubectl apply -f https://raw.githubusercontent.com/istio/istio/release-1.23/samples/bookinfo/platform/kube/bookinfo.yaml

# 또는

cd $HOME/istio-1.23.2
kubectl apply -f samples/bookinfo/platform/kube/bookinfo.yaml
kubectl apply -f samples/bookinfo/networking/virtual-service-all-v1.yaml
kubectl apply -f samples/bookinfo/networking/destination-rule-all.yaml
Test sample application
kubectl exec "$(kubectl get pod -l app=ratings -o jsonpath='{.items[0].metadata.name}')" -c ratings -- curl -sS productpage:9080/productpage | grep -o "<title>.*</title>"
ingress-bookinfo에서 생성한 ingress gateway를 통해 test
for i in {1..1000000}
do
curl -s -o /dev/null -H host:demo.mydomain.com  "http://$GATEWAY_URL/productpage"
sleep 1
done
View the dashboard
Install Kiali and the other addons
cd istio/istio-1.23.2/
kubectl apply -f samples/addons
kubectl rollout status deployment/kiali -n istio-system
결과
Waiting for deployment "kiali" rollout to finish: 0 of 1 updated replicas are available...
deployment "kiali" successfully rolled out
kiali dashboard
istioctl dashboard kiali --address 0.0.0.0
자신의 VM-ServerIP:20001/kiali
예시 http://119.81.215.35:20001/kiali

Kiali dashboard에서 왼쪽 Traffic Graph을 선택하고, 중앙 화면에서 다음과 같이 선택합니다.
Namespace : default Traffic : App graph Display : Traffic Animation
traffic 발생
for i in {1..1000000}
do
curl -s -o /dev/null -H host:demo.mydomain.com  "http://$GATEWAY_URL/productpage"
sleep 1
done
istio bluegreen
kubectl apply -f samples/bookinfo/platform/kube/bookinfo.yaml
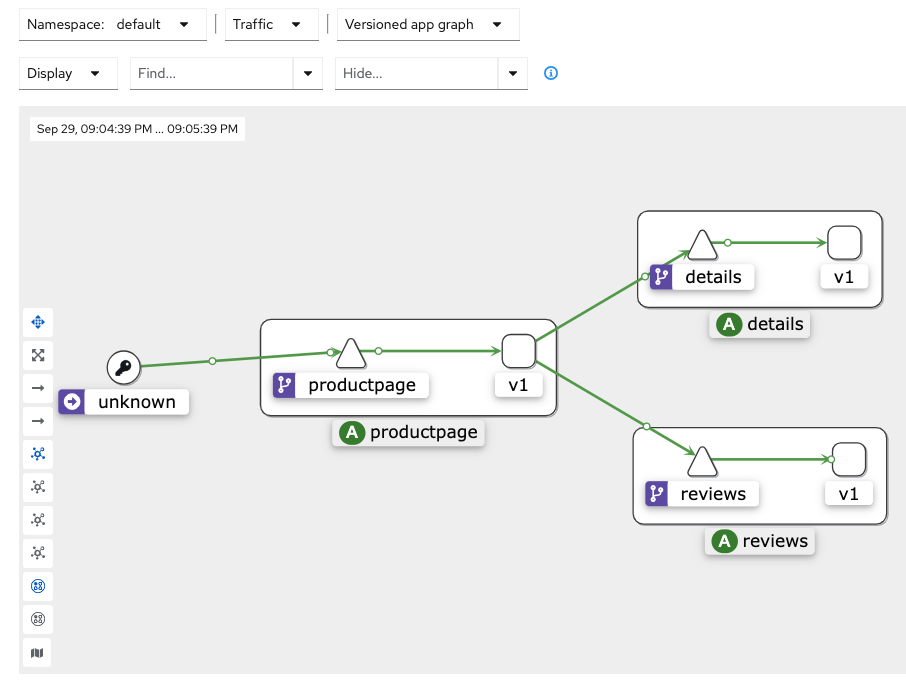
apiVersion: networking.istio.io/v1alpha3
kind: VirtualService
metadata:
  name: reviews
spec:
  hosts:
  - reviews
  http:
  - route:
    - destination:
        host: reviews
        subset: v2
v2 -> v1
apiVersion: networking.istio.io/v1alpha3
kind: VirtualService
metadata:
  name: reviews
spec:
  hosts:
  - reviews
  http:
  - route:
    - destination:
        host: reviews
        subset: v1
reviews의 virtualservice에서 destination의 subset을 v2로 변경합니다.
kubectl apply -f - <<EOF
> apiVersion: networking.istio.io/v1alpha3
kind: VirtualService
metadata:
  name: reviews
spec:
  hosts:
  - reviews
  http:
  - route:
    - destination:
        host: reviews
        subset: v2
> EOF
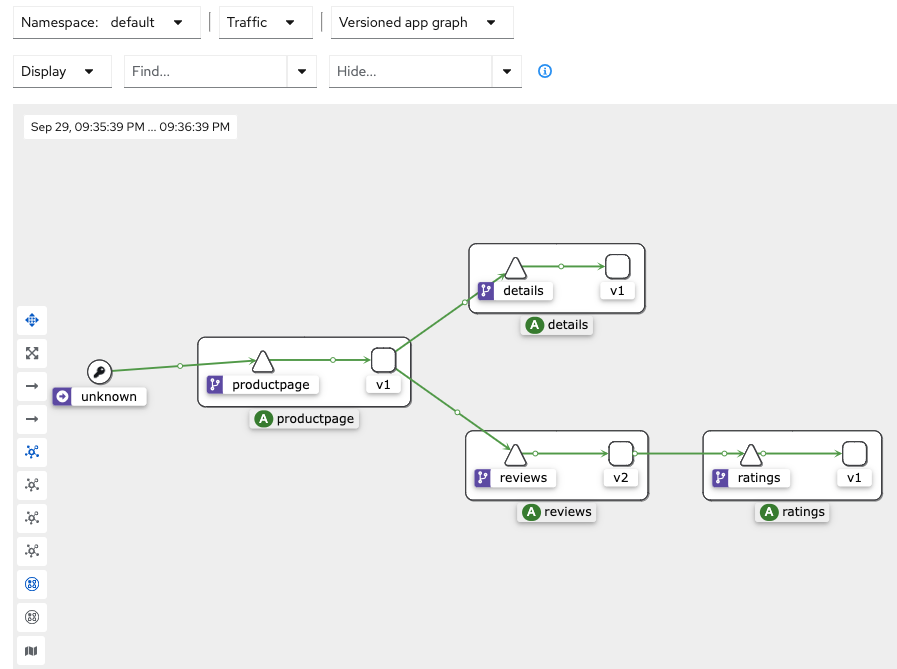
canary 배포
Traffic Graph 메뉴를 선택하고 중앙 화면에서 Display를 선택합니다. 왼쪽 상단에 Traffic Rate를 선택합니다.
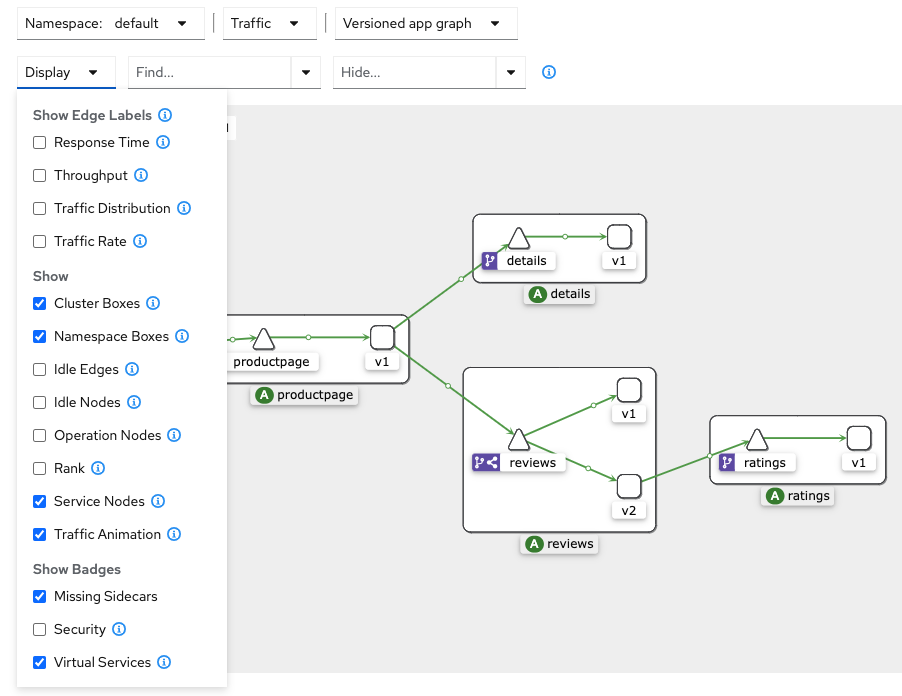
step 1
v1 버전에는 traffic 을 90%로 설정하고
v2 버전에는 traffic 을 10%로 설정합니다.
apiVersion: networking.istio.io/v1alpha3
kind: VirtualService
metadata:
  name: reviews
spec:
  hosts:
    - reviews
  http:
  - route:
    - destination:
        host: reviews
        subset: v1
      weight: 90
    - destination:
        host: reviews
        subset: v2
      weight: 10
step 2
v1 버전에는 traffic 을 60%로 설정하고
v2 버전에는 traffic 을 40%로 설정합니다.
그러면 트래픽이 v2로 점점 이동하여 6:4 비율로 트래픽을 전송합니다.
apiVersion: networking.istio.io/v1alpha3
kind: VirtualService
metadata:
  name: reviews
spec:
  hosts:
    - reviews
  http:
  - route:
    - destination:
        host: reviews
        subset: v1
      weight: 60
    - destination:
        host: reviews
        subset: v2
      weight: 40
step 3
v1 버전에는 traffic 을 20%로 설정하고
v2 버전에는 traffic 을 80%로 설정합니다.
그러면 트래픽이 v2로 점점 이동하여 6:4 비율로 트래픽을 전송합니다.
apiVersion: networking.istio.io/v1alpha3
kind: VirtualService
metadata:
  name: reviews
spec:
  hosts:
    - reviews
  http:
  - route:
    - destination:
        host: reviews
        subset: v1
      weight: 20
    - destination:
        host: reviews
        subset: v2
      weight: 80
detail을 v2로 배포
apiVersion: networking.istio.io/v1alpha3
kind: VirtualService
metadata:
  name: details
spec:
  hosts:
  - details
  http:
  - route:
    - destination:
        host: details
        subset: v2
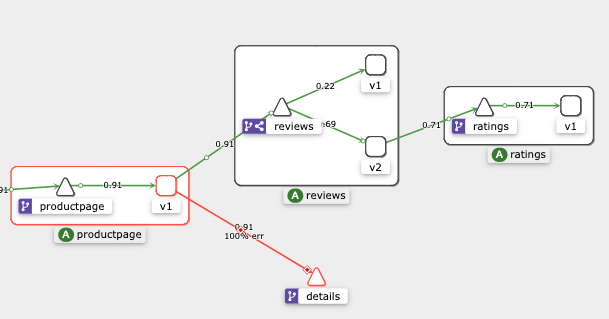
apiVersion: networking.istio.io/v1alpha3
kind: VirtualService
metadata:
  name: details
spec:
  hosts:
  - details
  http:
  - route:
    - destination:
        host: details
        subset: v1
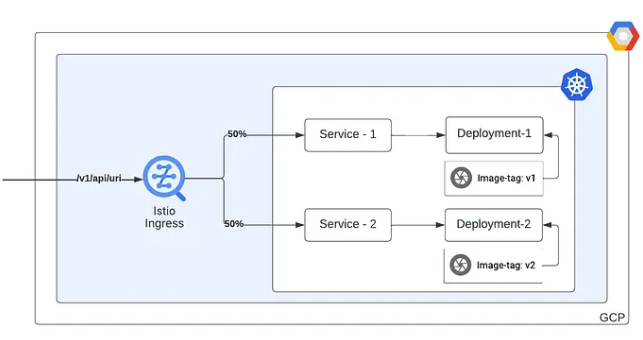
과제
애플리케이션
Uninstall Istio
istioctl uninstall --purge -y
kubectl delete namespace istio-system
// Service-1 with version "v1"
const express = require('express')
const app = express()
const port = 3000
const { v4 } = require('uuid');
app.get('/', (req, res) => {
  res.json({
    description: "Execution on version 1 deployment",
    version: "v1",
    uuid: v4(),
    timestamp: new Date(),
  })
})
app.listen(port, () => {
  console.log(`Example app listening on port ${port}`)
})
// Service-1 with version "v2"
const express = require('express')
const app = express()
const port = 3000
const { v4 } = require('uuid');
app.get('/', (req, res) => {
  res.json({
    description: "Execution on version 2 deployment",
    version: "v2",
    uuid: v4(),
    timestamp: new Date(),
  })
})
app.listen(port, () => {
  console.log(`App listening on port ${port}`)
})
댓글남기기